Key Takeaways
Start here
Understanding the Scope of a Bathroom Tile Job
Next
Planning Your Layout Before You Mix Anything
Then
Choosing the Right Adhesive and Tile Materials
When you're ready
Setting Tile: Technique and Common Mistakes
Final step
Grouting and Finishing Your Installation
Understanding the Scope of a Bathroom Tile Job
Bathroom tiling is one of the most rewarding DIY projects a homeowner can complete - but it rewards preparation far more than enthusiasm. Before ordering tile or renting tools, take stock of what's actually involved.
A tile project has three distinct phases: surface preparation, tile installation, and grouting and sealing. Each phase has its own cure or drying time, which means you cannot rush through a weekend without factoring in those windows. Skipping or compressing them is the single most common reason first-time tile jobs fail.
Also be honest about the limits of DIY work. Retiling an existing floor or wall surface is generally within reach for a careful beginner. Work that involves moving a drain, modifying plumbing supply lines, or repairing significant substrate rot requires a licensed plumber or contractor. If you're uncertain whether to hire out, our guide on questions to ask before hiring a contractor can help you evaluate your options.
Thinset mortar
A cement-based adhesive used to bond tile to floors and walls. It cures hard and resists moisture, making it the standard choice for wet bathroom areas.
Grout joint
The intentional gap left between tiles, which is later filled with grout. Joint width affects the final look and is controlled by plastic spacers placed between tiles during installation.
Tile backer board
A rigid, moisture-resistant panel (typically cement board) installed as a substrate behind tile in wet zones. It prevents the wall structure from absorbing moisture over time.
Notched trowel
A flat spreading tool with V-shaped or square teeth along its edge. The notches create uniform ridges in thinset that compress under tile to ensure even, full coverage.
PEI rating
A scale developed by the Porcelain Enamel Institute rating tile hardness and durability for foot traffic. Ratings run from 0 (wall tile only) to 5 (heavy commercial use).
Grout sealer
A liquid product applied over cured grout that penetrates the pores and repels water and staining agents. It extends the life of grout and should be reapplied periodically.
Planning Your Layout Before You Mix Anything
Layout planning is where most beginners skip ahead - and where most regrettable outcomes originate. Spend as much time on dry layout as you do on the actual installation.
Find the center of the room. For floors, snap chalk lines from the midpoints of opposite walls to locate the room's visual center. Begin your tile layout from this center point so that cut tiles at the perimeter are roughly equal on all sides. Avoid starting from a wall, which almost always results in awkward slivers at the opposite end.
Dry-lay a row of tiles. Place tiles (without adhesive) across the floor or up the wall, inserting spacers between them. This reveals exactly where cuts will fall and lets you shift the layout by half a tile to avoid difficult narrow cuts near fixtures or doorways.
Account for grout joint width. Standard bathroom tile grout joints run between 1/16 inch (for rectified tile with very precise edges) and 3/16 inch for typical ceramic. Your spacer size determines this, so buy spacers before planning rather than after.
The Half-Tile Shift Trick
If your dry layout reveals that tiles will land with a thin sliver (less than half a tile width) at one wall, shift your entire layout by half a tile width in that direction. This turns awkward narrow cuts into more manageable half-tile cuts on both sides of the room. A small adjustment at the planning stage saves significant frustration during installation.
Choosing the Right Adhesive and Tile Materials
Adhesive choice is not cosmetic - it directly affects whether your tile stays put in a wet environment.
Thinset mortar is the standard for bathroom floors and any wall area that sees direct water - inside a shower enclosure, for example. It is cement-based, bonds to cement board or properly prepared drywall, and cures to a hard, water-resistant surface. Modified thinset (with polymer additives) offers improved bond strength for most tile types and is a sensible default for beginners.
Tile backer board (cement board or a foam-core equivalent) should be used as the substrate in wet zones. Standard drywall, even moisture-resistant varieties, is not appropriate behind shower tile. If your current walls are standard drywall, factor in the time and cost of installing backer board before tiling.
When choosing tile itself, note that floor tile must be rated for floor use - wall tile is typically not rated for underfoot traffic and can crack. Check the tile's PEI rating: PEI 3 or above is generally suitable for residential bathroom floors.
Don't Use Mastic in Wet Zones
Organic mastic adhesive is sometimes sold alongside thinset and is easier to work with, which makes it appealing to beginners. However, mastic can re-emulsify - essentially dissolve - when exposed to sustained moisture. Using it in a shower enclosure or on a bathroom floor is a code-compliance issue in many jurisdictions and a reliable path to tile failure. Always use cement-based thinset in any bathroom area that gets wet.
Setting Tile: Technique and Common Mistakes
With your layout marked and substrate confirmed, you're ready to set tile.
Mix thinset to the right consistency. Properly mixed thinset holds a ridge without slumping - sometimes described as the consistency of peanut butter. Too wet, and tiles will slide; too stiff, and coverage under the tile will be poor.
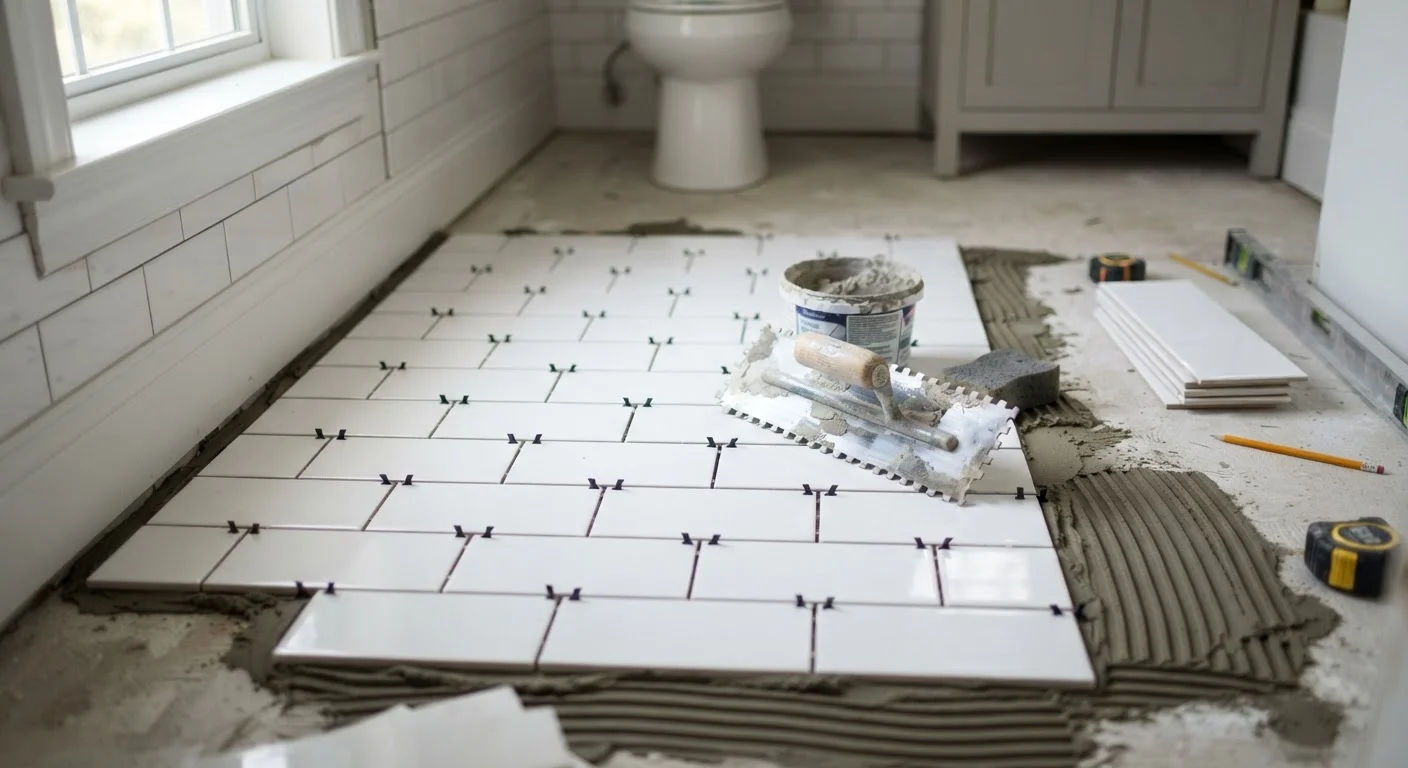
Apply thinset to the substrate using a notched trowel, holding it at roughly a 45-degree angle to create uniform ridges. Press each tile firmly into place with a slight twisting motion to collapse the ridges and achieve full contact. Periodically pull up a tile and check the back - you want at least 80% coverage (95% in wet areas). If you see bare spots, adjust your technique or trowel notch size.
Insert tile spacers at every corner as you go. Remove them before the thinset cures fully - usually after several hours but before the 24-hour mark. Work in manageable sections so thinset doesn't skin over before you place tile.
Use a level or straightedge frequently to confirm tiles aren't rocking or sitting higher than neighbors. Correct alignment issues immediately; once thinset cures, corrections require chiseling tile out.
Grouting and Finishing Your Installation
After your adhesive has fully cured - allow the full time recommended on the thinset packaging, typically 24 hours - you're ready to grout.
Choose the right grout. Unsanded grout is used for joints under 1/8 inch; sanded grout is used for wider joints. Epoxy grout is highly stain-resistant and durable but more difficult to work with and less forgiving for beginners - standard cement-based grout is a practical starting point.
Mix grout to a smooth, lump-free consistency and apply it with a rubber grout float held at a 45-degree angle, forcing the grout diagonally into joints. Work in sections of about 10 square feet. Remove excess grout from the tile face using the float edge held nearly perpendicular, then wipe diagonally across joints with a damp sponge - never along them, which pulls grout out. Rinse the sponge frequently.
Allow grout to cure fully before exposing the surface to water. After curing, apply a penetrating grout sealer to protect against moisture and staining. Re-sealing once a year is a low-effort habit that significantly extends the life of your installation. For context on what happens when grout isn't maintained, see our companion piece on why grout cracks and what it signals.
A completed tile job transforms a bathroom - and the skills you build carry directly into future projects. Keeping good records of the materials used, including leftover tile for future repairs, is a smart habit covered in broader detail in our guide to building a home management system.
This article provides general home improvement information for educational purposes. Building codes, permit requirements, and best practices vary by location. Consult a licensed contractor or building professional for work involving plumbing, structural elements, or any scope beyond cosmetic retiling.